Table of Contents
Attention: the network mapping of your home has a particular procedure, you can consult it here.
Access from Linux
Prerequisites
You need to install the “smbclient” and “cifs-utils” packages to access the shared folders.
You can start by listing the shares:
smbclient -L //srvstkXX.osupytheas.fr -U my_login_osusrvstkXX should be replaced by the name of the storage server according to your location:
[table id=6 /]
via the graphical interface (gnome, mate, cinnamon etc.)
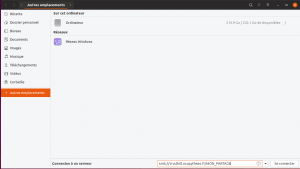
To access networked shared folders, open your file manager window
Then enter the URL to access the networked shared folder
smb://srvstkXX.osupytheas.fr/share_folder
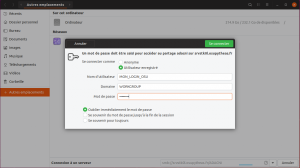
an authentication window opens, you have to give your OSU identifiers
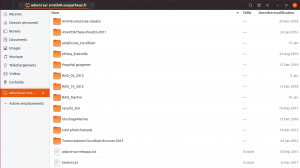
Your network share is now accessible:
On the command line
syntax:
mount -t cifs -o username=my_login_osu,password=mon_password_osu,mfsymlinks //srvstk0XX.osupytheas.fr/MY_SHAREFOLDER /mnt/local_mountExample for Luminy
mount -t cifs -o username=dupont,password=myPassword,mfsymlinks //srvstk0l.osupytheas.fr/glider_share /mnt/gliderSpécificité Linux Mint :
you must specify the CIFS protocol version:
mount -t cifs -o username=dupont,password=myPassword,mfsymlinks,vers=3.0 //srvstk0l.osupytheas.fr/glider_share /mnt/glider
When mounting your $home, remember also to specify the uid and gid parameters:
mount -t cifs -o username=dupont,password=myPassword,mfsymlinks,vers=3.0,uid=mon_uid_OSU,gid=mon_gid_OSU //srvstk0l.osupytheas.fr/my_login /mnt/my_loginTo make the mount persistent you must edit the /etc/fstab file and add the following line:
//srvstkXX.osupytheas.fr/sharefolder /mnt/sharefolder cifs auto,username=my_login_osu,passwd=my_passwd_osu,mfsymlinks 0 0